2011年2月25日星期五

How to create iPhone ringtone with Aiseesoft iPhone Ringtone Maker

You bought an iPhone and love all its features, but wish you didn't have to pay for your songs twice to get a ringtone. (We know that iPhone, iPhone 3G Ringtones use the file extension .M4R. And the users must pay $2 for a piece of song through Apple iTunes store). There are plenty of songs in your music library, but no way to make ringtones from any of them. Rihgt?

Actually, with a little bit of trickery (nothing illegal) you can create ringtones from any one of your non-DRM songs.

This works on both Mac and Windows PCs.

Window Users
You can create free iPhone Ringtones by yourself with Aiseesoft iPhone Ringtone Maker.

You can take the following step-by-step instructions to start.

Step 0: Download and install Aiseesoft iPhone Ringtone Maker. After a short while, you can see the following interface:


Step 1: Click “Browse” on the right side of "Input File" to import the file that you want to make ringtone from it.
Step 2: Play it and listen the music to find the segment that you want to use it as ringtone. Then drag and click the start & end slider to set your wanted segment, or type the start & end time in the corresponding text box directly to get the exact segment. You also can pre-listen the converted audio before generate.
Step 3: Click “Browse” on the right side of "Local Output Folder" to choose the output destination.
Step 4: Check "Export to iPhone" option, the converted ringtone will be load to your iPhone directly.
Step 5: After all the settings are finished, click “Generate” to begin making your own iPhone ringtone.

Key function
● Convert any video to iPhone ringtone M4R
● Create iPhone ringtone from any audio files
● Get any clips from video and audio
Edit Added iPhone ringtones
Using Aiseesoft iPhone Ringtone Maker, you are free to edit the added iPhone ringtone by removing it or renaming it directly.

For Mac Userd, please go to Aiseesoft
iPhone Ringtone Maker for Mac

2011年2月24日星期四

How to Convert Flip Video?

Flip video camcorder is becoming more and more popular among people because of its convenient, fast and easy-to-use. It can help you catch every moment that around you and share them with your friends at home or on line. But Flip video Camcorder records video just only in .MP4 format, how to make it to other formats and understood by Windows Media Player, Windows Movie Maker, iPod, iPhone, PSP and other PMPs.
All you need is just a Flip Converter which can help you solve this problem. Aiseesoft Flip Converter is the best Flip Video Converter to convert Flip video created by the Flip family: Flip Ultra, Flip Ultra HD, Flip Mino and Flip Mino HD as Flip Mino HD files conversion tool. With this Flip Video Converter, you can convert Flip video to any other video/audio formats MOV, M4V, AVI, 3GP, FLV, HD video and AAC, MP3, OGG, WMA, etc audio formats for all the players.


Here is a simple guide for you to follow and you need a Flip Converter

Step 1. Files importing
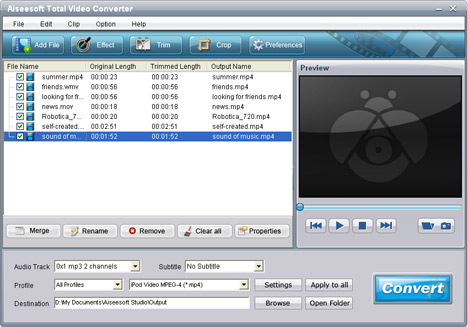
You can load your video by clicking “Add File” button or clicking “File” button, you can choose “add file” on a drop-down list. Or even drag the video and audio files into the file list window directly.


After importing the files, you can click button “a”to preview the video.
Tips: It allows you to capture your favorite pictures when you preview.
Click button “b” the current picture in the preview window will be captured and saved in the specified folder in the image type as you have set.
Click button “c” to open the snapshot folder to view the captured pictures
Step 2: Choose Your Output Profile and Settings
Profile: Select an output format for the selected file
Settings: Click “setting” to open the Settings windows:

Video Settings: Set video encoding settings by selecting an encoder, a resolution, a frame rate and video bitrate.
Audio Settings: Set audio encoding settings by selecting an encoder, a sample rate, channels and audio bitrate.
Tip 1: For Resolution setting, you can choose the pre-set Resolution from the right drop-down list. You can also directly input your own resolution as the form of "XXX*XXX".
Tip 2: You can customize the video and audio encoding settings and save them as your own profile. After you have chosen the encoding options, just click the “Save as...” button and name your profile, and then the profile will be saved in the User Defined list. You can use the customized profile next time by selecting it from the list.
Step 3: Video Editing

1: Effect:
Click “Effect” to open the edit window to adjust the video effects
You can adjust the “Brightness”, “Contrast”, “Saturation” and “Volume”.
2: Trim:
“Trim” function allows you to pick up any part of your video to convert. You can just convert a part of your video that you want.
There are three ways available:
Method 1: Enter the start time in the Start Time box and click OK, then enter the end time in the End Time box and click OK.
Method 2: Drag button*below the Preview Windows to mark the beginning of your clip and drag it to mark the end of your clip during the preview.
Method 3: While playing video, click button to mark the beginning of your clip and mark the end of your clip during the preview.
Tips: Click the second button to preview the video frame by frame.
Click preview button to preview you trimmed clip.
After you set trim time, the length of the captured clip will be shown in the Select Length box for your reference.
3: Crop:
“Crop” means to choose a certain play area to convert.
Method 1: Crop by adjusting the crop frame. The crop frame is the yellow line around the movie video. There are eight small adjustment boxes on the crop frame. Each adjustment box allows you to crop the movie video from a different position. To crop your movie video, you can just move your mouse cursor to an adjustment box and drag the crop frame.
Method 2: Crop by setting the crop values. There are four crop values at the bottom of the window: Left, Top, Right and Bottom. You can set each value to crop your movie video, and the crop frame will move accordingly.
Step 4: Conversion
After finishing all the necessary settings and editing, you can click “Start” to begin the conversion.

If you are a Mac user, here also a Flip Converter for Mac.

2011年2月16日星期三

Why use DVD Ripper?

DVD also is called "Digital Versatile Disc" or "Digital Video Disc", it is a popular optical disc storage media format. Its main uses are video and data storage.

A DVD ripper is a software program that facilitates copying the content of a DVD to a hard disk drive. They are mainly used to transfer video on DVDs to different formats, to edit or back up DVD content, and for converting DVD video for playback on media players and mobile devices. Some DVD rippers include additional features, such as the ability to decrypt DVDs, remove copy preventions and make disks unrestricted and region-free.
http://www.aiseesoft.com/dvd-ripper.html
The following is the main use of DVD rip software or DVD Ripper

* To watch DVD movies on other MP3/MP4 players like iPod, touch, iPhone, etc.
* To share DVD movies with friends online
* To protect DVD disc from scratches
* And more…

2011年2月15日星期二

How to Convert MP4 to SWF?

Aiseesoft Total Video Converter is powerful MP4 to SWF converter which helps you convert MP4 to SWF. In addition to this, it supports so many inputting formats including H.264/MPEG-4 AVC, FLV, 3GP, 3GPP, DivX, M4V… and converts them to video/audio for popular players in suitable output effect.

If you have MP4 files in hand and want to share them on Internet, please free download Aiseesoft Total Video Converter to finish your MP4 to SWF and other flash video conversion jobs with ease!
Now we will guide you to convert MP4 to SWF in fast and professional way.

Step 1: After downloading, launch this MP4 to SWF Converter

Step 2: Add files

Click to input MP4 video file to be converted (you can feel free to add MP4 files as many as you wish).

Step 3: Select output format and destination

Select the SWF video file to be converted from the profile list, the preview video screen may play the selected file. You are allowed to catch your favorite picture during previewing. Find SWF video in the folder you have set.


Step 4: Convert and upload

Press Start to convert. After converting MP4 to SWF, upload your SWF videos to websites for sharing.

Tip: If you need to customize your output video or audio files, try additional editing features such as Trim, Crop, Effect, Merge from the main user-friendly interface.

2011年2月11日星期五

How to Put DVD/Video on iPod, PSP, Computer, Zune, Xbox (Mac/Windows)

Many Mac users have iPod, PSP and other portable devices, but they can only enjoy songs and videos from iTunes or buy them from internet, because there is seldom nice Mac DVD and Video covnerter for iPod, PSP and other devices. Today I will introduce you an excellent DVD/Video converter for Mac: Aiseesoft DVD Converter for Mac It allows you to put your own DVDs and you own videos on your iPod, PSP, Mac Computer and other players on Mac.


This article aims to show you how to put your DVDs and videos on your iPod, PSP, Computer, Zune, Xbox and other players for Mac users.

Part 1. Convert DVD for Mac with Aiseesoft DVD Ripper for Mac

Step 1. Load DVD
Insert DVD into your DVD-ROM, run DVD Ripper for Mac, click “Load DVD”, find the DVD folder of the movie you want to add from your DVD-ROM, and Click “Open”.


Step 2. Set output format.
This best DVD ripper for Mac provides you output formats as many as you want. Just choose one from the drop down list “profile” according to your portable player.


If you are very professional with your player, you can also set your output parameter values such as Resolution, Frame Rate, Bitrate and Sample Rate and so on.


Tips:
1. Trim:

If you want to rip only a part of the DVD movie, please click “Trim” button and drag the “Start trim slider” to set the start time and “End trim slider” to set the end time. (a). You can also do that by clicking the “Start trim button” and “End trim button”(b). The third way you do that is set the exact Start/End time at the right of the pop-up window and click “OK”.


2. Crop:
If you want to remove the black edges or you want to rip a certain area of your video, please click the “Crop” button. You can do this either by drag the frame around the movie (a) or set the crop value: “Top, Left, Bottom, Right”.(b). Another way to do that is choose mode from “Crop Mode”(c).DVD Ripper for Mac also allows you to choose the output aspect ratio above the crop panel, “Keep Original, full screen, 16:9 and 4:3” are available.


3. Effect:
If you want to adjust the effect of your movie, please click the “Effect” button and a pop-up effect window will appear. It allows you to edit your movie’s effect including “Brightness, Contrast, Hue, Saturation and Volume”.

Click “Start” to begin your conversion.

Part 2. Convert videos for Mac with Aiseesoft Video Converter for Mac

Step 1. Choose “Video Converter for Mac” on the main interface.

Step 2. Add video
Click “Add File” to load your video that you want to put.
Step 3. Choose output profile and settings.
You can choose your output format from the drop down list and you can set the exact values of your output videos, such as Resolution, Frame Rate and so on.

You can do the video editing as the same way of convert DVDs.
After getting your satisfying video, then click “Start” button to start your conversion.

If you are a window user, Aiseesoft DVD Converter is your best choice.
It is the perfect combination of Aiseesoft DVD Ripper, Aiseesoft Total Video Converter and Aiseesoft iPod to Computer Transfer. With this powerful DVD Converter Suite, you can easily convert DVD and video to all the popular formats: MP4, H.264, AVI, MP3, WMV, WMA, FLV, MKV, MPEG-1, MPEG-2, 3GP, 3GPP, VOB, DivX, Mov, RM, RMVB, M4A, AAC, WAV, etc
And transfer your iPod songs and videos to your computer easily.